|
Home Restoration.
Restoring a Cooper S with Terry Hickey.
Part 1.
If I were to survey club members, I am sure that I would find a very healthy contingent among us that have much cherished cars, either still on the road or safely stored away in the corner of a garage, which they have plans to restore. I presume that there are many reasons why people delay the commencement of their restoration project and I would be quite certain that amongst the most popular reasons are the high cost of restoration and uncertainty about ones DIY skills. The purpose of this article is twofold, firstly to give a personal account of the trials and tribulations of home restoration. The second and probably more important purpose is to pass the message that if an office bound, modestly skilled, financially stretched mug like me with a pretty standard tool kit and a borrowed air compressor can do it, anybody can.
My restoration story starts with a boyhood dream from way back in the 60’s when Mini Coopers dominated world motor sport, that one day I would own a sparkling new Cooper S. Whilst lack of funds, timing and the ultimate demise of Mini Cooper S production in Australia meant that it would never be realised, I have never lost sight of that dream. It seemed appropriate therefore that with the onset of early middle age and in need of a challenge, the restoration of a Cooper S to ‘as new’ condition would provide the ideal escape from the pressures of the working week and realise my longstanding dream. The aim was to restore a Mk1 Cooper S to original ‘as new’ condition, doing as much as possible of the restoration myself. I estimated that the project would take 12 months and cost \$5000 (not including the initial purchase cost). The reality is that the restoration has taken me nearly 6 years to complete and ended up costing a little (but not a lot) more than the modest sum estimated. Overall, however, I found the project to be a very satisfying and rewarding experience.
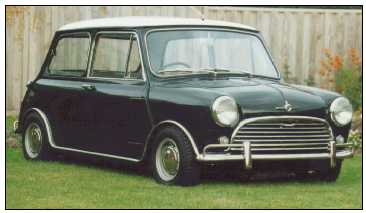
My Cooper S is a Mk1 and is car number 525 which was, in fact, the 25th Cooper S off the Australian production line (production commenced at no. 501). Being such an early car, there are some quite interesting features not common to other Australian Cooper S’s that I was very keen to preserve. Those features include an early type vertical mounted oil cooler, sun visor flaps that can be swung around to screen light from the door windows and early type rear view mirror.
I first purchased the car in 1989. It had been heavily modified by a previous owner. The rear tail lights had been replaced by the larger Clubman type lights, screw on flares were fitted, mag wheels, a roll cage, heavily modified dash (some of the dash rail had been cut out), completely non mini interior, non standard front panel and a front spoiler fitted. The car had been involved in rear end as well as front end collisions and, although repaired, the work had been carried out to a poor standard. The paint work, was original colour scheme (BRG/White) which looked OK from 10 feet away but dreadful up close. The engine, although original and with evidence that there had been quite a lot of money spent on it, was a non runner. The electrical wiring was an absolute nightmare having been substantially rewired by a previous owner using all red wire, it was totally impossible to trace wiring faults without considerable good luck or the skill of an auto electrician.
The first task was to rebuild the engine which I did straight away. Although a non runner, after a bit of coaxing I got it going and it ran quite strongly with good compression readings. However, it blew a copious amount of white smoke.
I later found out that the problem was that the brake servo unit was faulty allowing brake fluid to be drawn into the engine. The engine rebuild was very simple and straight forward. The bores were measured and were found to be well within specification for the pistons. Therefore, block machining was limited to having the bores honed to remove any glazing, ‘top decking’ to ensure a flat surface and then pressure cleaning to remove any swarf and ensure that all oil ways were clean. The crank did not require a regrind. Similarly, the cam and bearings were fine and not touched.
I reassembled the engine using new main and big end bearings, thrust washers, piston rings tappets and timing chain. The head was stripped and found to be in very good condition. A decoke, reseating of the valves and new valve stem seals were all that was required. The whole lot was reassembled and fitted to the car. The plan was that I would drive the car about for a little while to run the motor in and fix what else was necessary mechanically. I would then pull the car off the road, strip it down and commence the restoration, confident in the knowledge that the mechanical components would only need cleaning and painting. The reality was that I was having so much fun driving the car that it was not until June in 1991 that I finally took the car of the road for restoration.
Anyone who has ever done a major restoration will know that the initial burst of enthusiasm needs to be ‘tempered’ with foresight and planning. There is, in fact, no substitute for carefully disassembling of your car, keeping accurate records of what came from where and taking as many detailed photographs as possible. Once disassembled, all parts should be carefully inspected, cleaned, labelled and stored - you should not throw anything out until you have a suitable replacement. A running catalogue should also be kept to ensure that you know what parts need to be replaced or refurbished. Experienced restorers advise that each additional day spent in dismantling properly will save you many days in overall restoration time. But what do experienced restorers know? I was far too ‘smart’ to follow their advice and dismantled my little piece of motoring history in a single weekend. I had no time to take photographs and, besides, my hands were dirty and would have stuffed up the camera. Similarly, I adopted a very minimal approach to parts cataloguing - bits to be kept on the left, bits to be chucked out on the right. At the end of that weekend I took a trailer load of ‘junk’ to the tip and boxed up all of the parts I was going to keep, labelled each box, simply, ‘Mini bits’ and stored them in a corner of the garage. Whilst I would live to regret my ‘fast track’ dismantling approach, the biggest mistake was taking the ‘junk’ to the tip, it is just amazing how much easier it would have been searching for replacement parts if I had the original as a guide.
Now that I had reduced my pride and joy to a bare shell sitting on two carpenter’s horses in the garage, it was time to strip paint work and see what was underneath. I decided against sand blasting because I had heard that it caused panel distortion. Similarly, I did not like the idea of chemical dipping because it, apparently, removes paint and sealer from areas where it is very difficult to reseal or repaint. As I had not heard of plastic bead stripping at the time, I went for the trusty can of paint stripper, scraper and wire brush method. It took me about a month to strip everything inside, outside and underneath. It was very dirty, hard work and what I had in the end was a shell that resembled a sardine tin. Bright metal with badly repaired rear panels and front guards but, mercifully, only slight rust in the battery box, passenger side hinge panel and door bottoms.
I thoroughly washed down the shell to neutralise any chemical stripper residue and gave it a very light spray of clear lacquer to protect against surface rust, as I planned that it would be a couple of months before I started on the body repairs and repainting. I was now ready to start the rebuild.
Terry Hickey
|